About this blog

If you're looking for me to brag about how cute my kids are (which they are) or talk about how much weight I did or didn't lose this week, you are in the wrong place! I have a Facebook account for that. This blog is about the blunt truths of parenting, tips and tricks of the trade, some addicting mommy junk and all the other disgusting hilarity that ensues when you have kids...especially two kids only 12 months apart like myself.

Search This Blog

Showing posts with label mickey mouse. Show all posts

Friday, April 15

Mickey and Minnie Party: Candle Holders

As you know, I am busting my booty on planning my kids a fantastic Mickey and Minnie party for their second and third birthdays in May. However, I have champagne taste on a beer budget.

Here are the cutest candle holders ever that I wanted to buy, but couldn't see paying nearly $30 for two with shipping. They are from Hands 2 Design.


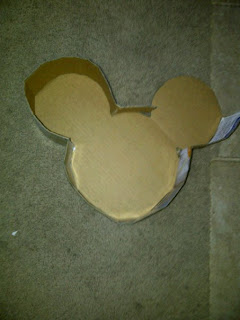
So I tried to make my own from Playdough. The turned out super cute (I know the photo quality sucks...camera phone, ok?).


However, they dried like this even though I followed instructions on how to dry playdough out without it cracking (totally B.S.)...


So I bought some awesome Crayola Model Magic Deluxe Variety Pack and tried again.


 I used cut toothpicks to hold the balls together and hot glued a hand-tied bow to an additional toothpick for Minnie's bow.


Playdough is much easier to work with and looked much better before it dried. The Model Magic was much harder to roll into smooth perfect balls and it got a bit smooshed when drying from its own weight. I think I like them....if I decide I don't like the new ones, I'll make playdough ones last minute and just use them wet! God knows Bubbi has eaten her share of playdough and lived to tell the tale!


Monday, April 4

Mickey and Minne Party: The Outfits!

So I was getting ready to work on my next preschool post (how to choose one) when I remembered to check the mail. AND GUESS WHAT CAME!?!?

The kid's Mickey and Minnie shirts from Ollie B Boutique!! THEY ARE SO F-ING CUTE!!! And I am really impressed with the quality too!

Here are the pics from her site, http://olliebboutique.blogspot.com/.


And here are so not so fab ones I took with my camera phone, but you get the idea...


And here is Bubbi's shirt with the pettiskirt I got from Dollar Daisies. The skirt is cute and I got it for the amazing price of $15.99. The hems are machine sewn so I'm thinking they'll hold well. However, there are tons of stray stings I need to snip off. So I would recommend for the price, but remember you get what you pay for (most pettiskirts start at $30 and go well over $100).

And yes, I will get great pics of the kids in their freaking adorable outfits, but not right now. They're napping and overall sticky and dirty today (I gave them a popsicle before lunch). Plus smart one here can't find the cord for her camera.

Saturday, March 26

Mickey and Minnie Party: Birthday Banners

You know it, I'm cheap. So when I decided I wanted two separate custom birthday banners for the kids Mickey and Minnie birthday party in May I flipped out at the thought of paying somewhere between $15-$50 PER BANNER! Love me some etsy.com, but hell no!

So what would any wannabe Mommy Stewart do? Make them herself!

I bought super cute paper at Michaels. I scouted out what I wanted then waited...no way are you going to catch my cheap ass spending almost a dollar on ONE piece of paper! A few weeks into watching the ads and the paper I wanted went on sale for $0.25 a piece (now that I can do). See ladies, you must plan ahead if you want to save money!

I also bought the letters at Michaels. I was tempted to buy a Cricut 29-0001 Personal Electronic Cutting Machine, but decided I'm not into crafting enough to justify the purchase. I think two packs of letters cost me about $4.00....I found them in by the poster board.

I bought the Mickey Head Punches and Scalloped Circles at Jacquelines Paper since I opted not to buy the Cricut 29-0001 Personal Electronic Cutting Machine and do it myself.

The best item I purchased for this project is my Martha Stewart Crafts™ Large Circle Cutter. Works sooooo well and I have already used it on several other crafts!

Here are the finished products:


I liked round for the girly Minnie look with red and white polka dots....


And I went with the triangular flag look for the boyish Mickey banner with red and white stripes...


I am currently working on another banner for an All Star themed baby shower. I will show a break down of how I made that one for those of you who want to make your own but aren't too crafty!


Monday, March 14

Mickey and Minnie Party: Pinata

Call me cheap, but it makes me cringe paying $20 for something a bunch of kids are literally just going to beat the crap out of. Then you pay close to another $20 for candy to put in it. Forty dollars for a pinata? Now that just doesn't fit well in my newly instated birthday budget (hubby finally found out how much I spent on the kids last party and that was the end of that).

Having a pinata is almost as important as having a cake for me. No, I'm not Hispanic. BUT I grew up in San Diego, just a few minutes from Tijuana...so let's just say I may be in many aspects.

Ok, so I'm not going to break the budget on buying a pinata, but I'm going to have one. Not really something you find at Goodwill...kinda like a tampon, once its used its used!

Insert hours of online obsessing over the kids upcoming Mickey and Minne party and HOLY QUAC look what I found! No, I'm not smart enough to just google "how to make a pinata". I just stumbled on it.


Her blog has an amazing step-by-step breakdown of how to make a Minnie pinata from a diaper box and crate paper....all stuff I had at home!

First thought: It is probably hard to make a pinata? Wait, I'm a college graduate and I'm going to go ahead and assume the standard pinata maker is a child laborer in Mexico. Let's give it a whirl. 

I didn't take pictures of my every step, but here are a few:


And here is the finished product:


The only part that took a while was scrunching the crate paper. The cutting was super easy thanks to a Goodwill find, Black & Decker SZ360 3.6-Volt Ni-Cad Cordless Power Scissors. I used a wire dry cleaning hanger to hang it instead of craft wire or whatever you are supposed to (think cheap)

I know, my guest bedroom is trashed. We plan on taking that panel down...I think. Judge away.

So one side has a bow, Minnie Mouse, and the other side doesn't (use your imagination), Mickey Mouse. Free-fifty!